Chassis
This is the next stage of the restoration, you can do the engine or the body work before the chassis but this is the way that I decided to do the restoration, next I did the engine
21/04/2011
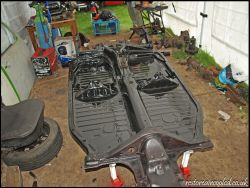
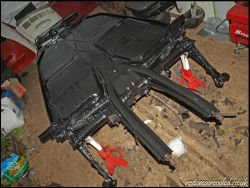
Did a lot of work today I spent 6 or so hours drilling out the spot weld that held the floor pans in place, this consisted of first chipping away at the tar/bitumen which had been used as seam sealer and sound deadening, this seem to take forever, then we got a wire brush on a angle grinder to get rid of all the crap that was sat on the spot welds then drilled the spot weld with a ¼ drill bit but don’t drill all the way, then swap the drill bit yet again for a special spot welding drill bit, but again this was only to go through the spot weld not to go through the metal underneath otherwise I will have nothing to weld onto when it comes to fitting the floor pans, the was about 70 to 80 or so welds to drill then a lot of hammering to take the pans out but it left us with these.
You can see from the photo that there was a weld ever inch or so, while doing this it uncovered some places that will need some patching up but it’s summat that shouldn’t be too bad to do.
These holes shouldn't be too hard to patch up just knock up a bit of metal and weld it in place, also we took the brake lines and master cylinder off as well at the rest of the from end, as you can see from the pictures above, while tidying up I also found a good spot for my seat as well
I some how don’t think that it will catch on!!! And the last shot before I close it up for the day.
23/04/2011
Well I’m skint I’ve spent up I decided to get some of the things I needed, got quite a few things such as
Engine Gasket Set |
Accelerator cable |
Heat Cable |
Heat Cable |
Clutch Cable |
Clutch Cable Conduct |
Heat Exchanges Pair |
Heat Exchange Fittings, With Aluminium Hose |
Exhaust Muffler And Silencer Kit |
Floor Pan Left |
Floor Pan Right |
Most of this should be coming shortly bar the floor pans that will be coming when they come in stock, which is expected in 4 or so weeks but this won’t slow the build down because I still have plenty of things to do in the mean time.
24/04/2011
Not the biggest update but it is still a update, today I started on the de tarring of the chassis, this has got to be the dullest job to do so I only could do it for a couple of hours before boredom kicked in, but I managed to get most of it don’t there is just a little bit left to do on the tunnel but it shouldn’t be too much.
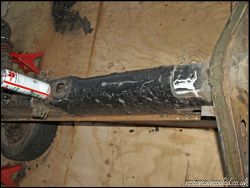
And here is the bit that I have got left to do, also in the photo below I scraped some weird glue off my chassis, that hasn’t set meaning it gets everywhere.
And not forgetting the tar that comes off the car.
09/06/2011
Not the biggest update but the workshop was getting a bit messy and it was hard to get to work on the chassis so a quick tidy up.
15/06/2011
Cracking on with the chassis a needed to strip the rear of the car down so off with the trailing arms. This wasn't too hard because someone has had it off before the bolts weren’t too tight.
.jpg)
Once these were off it was off with the damper and the driveshaft, I also looked in the drums to see how bad there were. This was easier said than done we took the split pin out so we assumed that it wont be too tight. We were wrong it was silly tight but we managed to crack the nut so to speak. We then opened the drums to find all new pads and the drums weren’t original because there was no lip. This was good new means I don’t have to but new ones.
.jpg)
We put the drum back on so that we didn’t lose the bolt. And cracked on with the rust. It was my first time using a weld and all I had to do was weld a little hole and yeah, I went crazy but it will be ok one I’ve got the angle grinder on it.
.jpg)
I spotted a small hole on the underside of the chassis so I turned it over and wire brushed round the hole to have some nice clean metal to weld to, this is where it goes downhill. It revealed a few more holes.
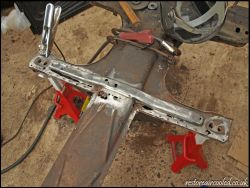
This is how I left it because I come to the conclusion to replace the bottom of the frame head, because I think that it takes a lot of strain so I want it to be done proper.
21/06/2011
Not a big update but I’ve pained a few bits suspension arms and roll bar; I’ve also cancelled the order of the floor pan, and ordered it from a different place because they were starting to take the piss. Anyway I didn’t get and photos because I’m sure you will see them later on in the build.
22/06/2011
I did some cleaning of the chassis with the wire brush to get all the crap off it but hopefully I will be welding the floor pans in because all my bits turned up today, also I started to work on refurbing the empi 8 wheels but this is just a little side job to do so they will be finished for when the chassis is.
23/06/2011
Major progress on the beetle which is good we had to weld the floor pans in but it wasn't as simple as just dropping them in and then welding them into place, it never is so we first put them into place and then marked up where will need trimming then back off trim them then put them back. We had to keep doing this until they fit nice. Then when we had don’t this we had to take it out and I put holes in ready for welding it into place.
Then once laid back down, we had to measure the bolt holes I could get some tacks down to hold them in place once this had done I could crack on with the other welds so I ended up with something like this.
.jpg)
.jpg)
.jpg)
On the back of the drives side floor pan we modified it because the existing brace that was there was solid so there was no point grinding it away. to then fix a new one
.jpg)
When the welds had gone cold I coated it all with Krust so that and rust I hadn’t spotted has become more ridged.
.jpg)
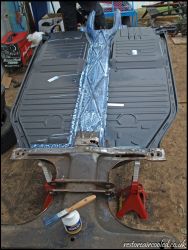
And that’s how I left it I will crack on with it in the morning.
24/06/2011
First thing was first I was to get myself down the shop and get some tiger seal to use as a seam sealer, I thought this was a good choice because tiger seal doesn’t come off with any ease so after I had got a couple of tubes I cracked on with the sealing of it, ive only done the top and the underside rear because im waiting for a part to come in the post.
.jpg)
.jpg)
Once this had been put on I could crack on with the krusting.
.jpg)
.jpg)
After I did this I started to crust the trailing arms but ran out to off to Halfords to get some more. After I got back I cracked on with painting it in krust again.
Once I had done this the tiger seal that I had put on the pan has dried so I could start prepping the chassis for paint, so I first got rid of all the sound deadening and ruffed up the new floor pans so that the POR15 has a good surface to stick to which ended up with this.
.jpg)
Once this was ready I could crack on painting, I was very impressed with the finish.
30/06/2011
Not the biggest update but I have painted my trailing arms with POR 15 ready to put it all back together also, the frame head bottom has turned up today so I will be welding that in place tomorrow, then it should start coming together.
01/07/2011
Update time, we didn’t get to the stage that I wanted to get to but I still got a fair bit done on the chassis, the first thing to do was to drill the spot welds that were hold the bottom of the frame head on, along with cutting it neatly before the suspension arms so that I can weld the new panel in without messing with the suspension geometry. In the process of drilling the spot weld the drill decided to be on constant hammer action so we took it to bit and remover the bit that has the hammer action. With this it was worse and now every time you use it its like a smoke machine but with just 3 welds left we used it. Anyway the pics.
Once I had done this I hovered all crap out of the tunnel and cleaned the metal so it will be a clean weld.
.jpg)
Once this was all cleaned I threaded the clutch cable through the tunnel because I thought it would be easier. When this was done I Krusted the metal.
Then on with the welding so the first bit.
Then with the second bit I had to drill some holes it because it was thicker metal that the floor pans, this meant a trip to the shop for a new drill.
.jpg)
.jpg)
Then once again cover it in krust.
.jpg)
Then on with the seam sealer, but I had to do all the underneath.
And then with the POR 15.
By this time it was too late to shults the car so I will have to leave it for tomorrow, so if all goes to plan there should be a update tomorrow.
02/07/2011
Did a little painting with the POR 15 I did the shocks on the back for the back of the car. Then later on I started with the shults, the first thing to do was to weld the accelerator pedal on.
.jpg)
Once I had done this the shults could begin, first we masked the area that we didn’t want the shults to get.
Once it was masked I could begin with the spraying with the shults. It took some getting though the gun but once it was going it worked great and left a nice finish.
.jpg)
.jpg)
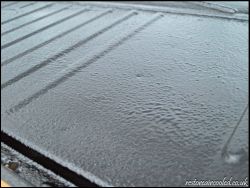
Hopefully the assembly will start tomorrow and start taking shape.
03/07/2011
Got some good progress today which I was rather happy with first up was to do the front arms which were straight forward the only bet that took some doing was to squash the bushes.
Then it was onto the IRS which then got tricky because we did have a tool to screw the strange bolt that held the trailing arms on so we decided to make one, simply weld two nuts together simples.
.jpg)
So now with my ‘special’ tool I can crack on with the trailing arms
.jpg)
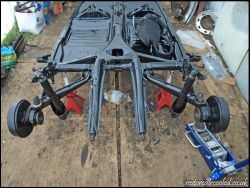
And that’s is for the night, I’ve also sold a few bits so the cost has come down
05/07/2011
I’ve made some more great progress I painted the front of the beetle with POR 15, then I started on the rear end again this time it was sorting the torsion bar which is just hard work, after a lot of messing about I managed to move the torsion bar to the correct place. Or so I hope then had the put the spring plate on, which has to be sprung in place by jacking it up. This caused a problem because the chassis has no weight to it so both me and my dad has to sit on the chassis but we eventually managed it. To hold it in place the torsion bar covers needed to go on, but I had got the ones which have spaces which clearly didn’t fit so outcome the hammer and mole grips and ended up with.
.jpg)
.jpg)
This now means that they fit which is brilliant, so now I can bolt one side all together.
.jpg)
We then decided that it was too hard to do the other side the same night, so I then started to the brakes. First on with the brake master cylinder.
.jpg)
Then once this had been fit I could crack on with the first brake line, which was fiddly because it was so long but we did manage to fit it.
Then we called it a night because it was the morning.
06/07/2011
Did some more work tonight which was great, I managed to install the rest of the brake pipes onto the chassis which was a straight forward task because I had kept all the old ones so I could just make them both the same so they fit just right. I also fitted some of the cables through the tunnel but I still need to order some more.
07/07/2011
A lot of progress done today which is really good, I’m at the stage of getting giddy because of things are starting to come together so on wards, the first thing was to sort the other spring plate out when seemed easier this time around, then on with the rear wheels and off the axel stands which is brill but have to remember to put a brick under the wheel to stop if from rolling off.
.jpg)
Then I had to sort the pedal box out so I had to get the welder out but after some drilling and welding they were in.
.jpg)
Next on list of bits to do was the front bit, I have a clue what its there for but I sealed it onto the chassis.
.jpg)
Then on with the front suspension I haven’t stripped these because I will be changing the discs but with storing the chassis outside I left the old ones on because new ones would just end up rusting, we hammered the struts on and made up a jig so that the car can stand itself up making it easier to roll about.
.jpg)
Its eventually back on four wheels which is great.
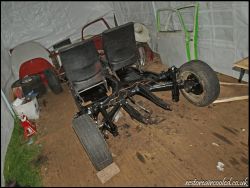
It looks brill; I’ve also ordered some more bits for the beetle.
08/07/2011
Didn’t get any photo’s today because all the work was to do with the tunnel, which was to thread all the cable that I have just bought though the relevant tubes but the problem was that the heater cable tubes are rusted shut so we will have to think of a way of clearing them or fixing them up.
12/01/2012
Didn’t do much today, all that I did was to por-15 the gearbox and the steering linkages so that they look all nice again. Anyways I managed to get a couple of pics.
13/01/2012
Managed to do a few things today, the first was to paint the steering box and idler that I had forgotten to do previously which turned out well.
25/04/2012
Now that the body is at the paint shop I still have some work on the chassis to do before I get the body back home, first up was to strip the front of the car down, so outcome the air gun and off came everything, all the hubs backing plates and struts were stripped. Here are some pictures I grabbed.
.jpg)
Once I had took the struts apart I had a look at the lowering springs.
.jpg)
As you can see from the photo the spring on the right is very bent, so not taking any chances a new set of lowering springs have been ordered. Next on the things left to do was to poly bush the clutch, so after I put in together I seen that it was loose so to tighten it I used the trust hammer.
.jpg)
Once that was fitted I could fit the steering uj covers.
27/04/2012
First thing to do today was to clean and prime the bits that I had taken apart last time, here are some pictures
While the primer was drying I thread locked the studs in on the drum at the back.
Once that was done I looked at the front struts, the inserts need replacing as the both leak and the strut itself needed some welding, so out came the welder.
.jpg)
Also the new springs came as you can tell they are miles better than the ones I took off.
.jpg)
Now that the primer has dried I can get on with painting everything in por15.
28/04/2012
The strut inserts have arrived but they are for the 3 bolt mounting shocks, so I will be sending them back and getting new one, but this doesn’t mean that I can’t get on with some, I can put together the hub disc and calliper.
.jpg)
.jpg)
They now look all nice a new, then was to fit them onto the car. I also put the steering bits and pieces on just to see how they fit.
30/04/2012
I now had to have a look at the dash as it had seen better days, after some cleaning gluing and painting it came out looking like.
Now that that had done, the seat cover that I had ordered turn up and so we cracked on fitting them.
01/05/2012
First up was to finish re trimming the seats, this time is went easier because we had already done one seat so we knew what we were doing.
.jpg)
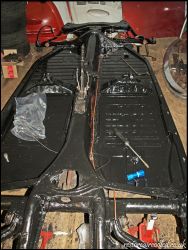
Then work on the chassis continued, we mounted the gear box and connect and greased both drive shafts. We also connected the clutch cable to the clutch.

.jpg)
.jpg)
.jpg)
.jpg)
.jpg)
.jpg)
.jpg)
.jpg)
.jpg)
.jpg)
.jpg)
.jpg)
.jpg)
.jpg)
.jpg)
.jpg)
.jpg)
.jpg)
.jpg)
.jpg)
.jpg)
.jpg)
.jpg)
.jpg)
.jpg)
.jpg)
.jpg)
.jpg)
.jpg)
.jpg)
.jpg)
.jpg)
.jpg)
.jpg)
.jpg)
.jpg)
.jpg)
.jpg)
.jpg)
.jpg)
.jpg)